HTML Form
HTML Forms are required to collect different kinds of user inputs fields, such as contact details like text fields, name, email address, phone numbers, buttons, menus, checkboxes, radio-buttons, or details like credit card information, etc.
HTML Form Syntax:
<form action="server url" method="get|post">
 //input controls e.g. textfield, textarea, radiobutton, button
</form>
HTML Form Tags:
<form> – Form to enter inputs by the used side.
<input> – Input control.
<textarea> – Multi-line input control.
<label> – Label for an input element.
<fieldset> – Groups the related element in a form.
<legend> – Caption for a <fieldset> element.
<select> – Drop-down list.
<optgroup> – Related options in a drop-down list.
<option> – Option in a drop-down list.
<button> – Clickable button.
HTML 5 Form Tags:
<datalist> – Provides a list of pre-defined options for input control.
<keygen> – Key-pair generator field for forms.
<output> – Result of a calculation.
HTML <form> element:
The HTML <form> element specifies a document section to take input from user. The HTML <form> tag is a container for provides different types of input elements, such as text fields, checkboxes, radio buttons, submit buttons, password fields, etc.
Note: The <form> element does not itself create a form but it is container to contain all required form elements, such as <input>, <label>, etc.
Syntax:
<form>
//Form elements
</form>
HTML <input> element:
The HTML <input> element is fundamental form element. It is used to create form fields, to take input from the user fields. We can apply different input filed to gather different information from users.
Example:
<body>
 <form>
  <h1>Enter your name </h1> <br>
  <input type="text" name="username">
 </form>
</body>
OUTPUT:

HTML Text Field Control:
The <input type=”text”> attribute of input tag creates text-field control also known as a single-line input field for text input.
Example:
<form>
  First Name: <input type="text" name="firstname"/> <br/>
  Last Name:  <input type="text" name="lastname"/> <br/>
</form>
OUTPUT:

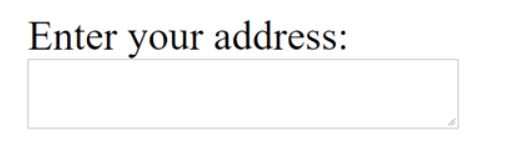
<textarea> tag in form:
The <textarea> tag is a multiple-line text input control that allows a user to enter more than one line of text. Multi-line text input controls are created using an <textarea> element and The size of <textarea> can be provide either using “rows” or “cols” attribute or by CSS.
Example:
<!DOCTYPE html>
<html>
<head>
  <title>Form in HTML</title>
</head>
<body>
 <form>
    Enter your address:<br>
   <textarea rows="2" cols="20"></textarea>
 </form>
</body>
</html>
OUTPUT:
Label Tag in Form:
The <label> tag defines a label for many <form> elements.The <label> element is useful for screen-reader users because the screen-reader will read out loud the label when the user focuses on the input element.
The <label> tag also provides users who have difficulty clicking on very small regions such as radio buttons or checkboxes. Because when the user clicks the text within the <label> element, it toggles the radio button or checkbox.
The for attribute of the <label> tag should be equal to the id attribute of the <input> element to bind them together.
Example:
<form>
  <label for="firstname">First Name: </label> <br/>
       <input type="text" id="firstname" name="firstname"/> <br/>
 <label for="lastname">Last Name: </label>
       <input type="text" id="lastname" name="lastname"/> <br/>
</form>
OUTPUT:

Password Field Control:
Password fields are similar to text fields. The password is not shown to the user in password field control. They are shown as asterisks or dots.
Example:
<form>
  <label for="password">Password: </label>
       <input type="password" id="password" name="password"/> <br/>
</form>
OUTPUT:

HTML 5 Email Field Control:
The email field is new in HTML 5. It validates the text for the correct email. You must use @ and . in this field.
Example:
<form>
  <label for="email">Email: </label>
       <input type="email" id="email" name="email"/> <br/>
</form>
OUTPUT:

Note: Not enter the correct email, it will display error like.

Radio Button Control:
Radio buttons are used to select exactly one option from a pre-defined set of options. It is created using an <input> element whose type attribute has a value of radio.
Example:
<form>
  <label for="gender">Gender: </label>
       <input type="radio" id="gender" name="gender" value="male"/>Male
       <input type="radio" id="gender" name="gender" value="female"/>Female <br/>
</form>
OUTPUT:

Checkbox Control:
Checkboxes control allows the user to select one or more options from a pre-defined set of options. It is created using an <input> element whose type attribute has a value of the checkbox.
The <input type=”checkbox”> defines a checkbox.
Example:
<form>
Hobby:<br>
       <input type="checkbox" id="cricket" name="cricket" value="cricket"/>
         <label for="cricket">Reading Books</label> <br>
       <input type="checkbox" id="football" name="football" value="football"/>
         <label for="football">Music</label> <br>
       <input type="checkbox" id="hockey" name="hockey" value="hockey"/>
         <label for="hockey">Hockey</label>
</form>
OUTPUT:

Submit button control:
HTML <input type=”submit”> are used to add a submit button on web page. When the user clicks on the submit button, then the form gets submitted to the server side.
A reset button resets all the forms control to default values or fields.
Example:
<form>
    <label for="first-name">First Name:</label>
    <input type="text" name="first-name" id="first-name">
    <input type="submit" value="Submit">
    <input type="reset" value="Reset">
  </form>
OUTPUT:

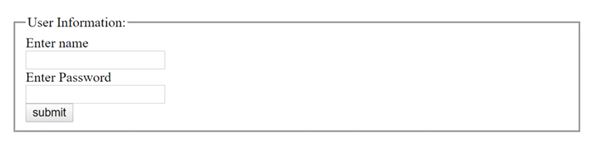
HTML <fieldset> element:
The <fieldset> element in HTML is used to group the related information of a form field. This element is used with <legend> element which provides a caption for the grouped elements.
Example:
<form>
   <fieldset>
    <legend>User Information:</legend>
   <label for="name">Enter name</label><br>
<input type="text" id="name" name="name"><br>
<label for="pass">Enter Password</label><br>
<input type="Password" id="pass" name="pass"><br>
<input type="submit" value="submit">
</fieldset>
<form>
OUTPUT:
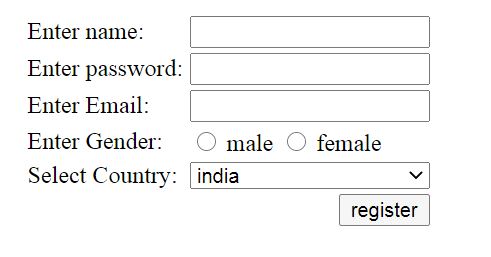
HTML Form Example:
<!DOCTYPE>
<html>
<body>
<form>
<table>
<tr>
  <td class="tdLabel"><label for="register_name" class="label">Enter name:</label></td>
  <td><input type="text" name="name" value="" id="register_name" style="width:160px"/></td>
</tr>
<tr>
  <td class="tdLabel"><label for="register_password" class="label">Enter password:</label></td>
  <td><input type="password" name="password" id="register_password" style="width:160px"/></td>
</tr>
<tr>
  <td class="tdLabel"><label for="register_email" class="label">Enter Email:</label></td>
  <td
><input type="email" name="email" value="" id="register_email" style="width:160px"/></td>
</tr>
<tr>
  <td class="tdLabel"><label for="register_gender" class="label">Enter Gender:</label></td>
  <td>
<input type="radio" name="gender" id="register_gendermale" value="male"/>
<label for="register_gendermale">male</label>
<input type="radio" name="gender" id="register_genderfemale" value="female"/>
<label for="register_genderfemale">female</label>
  </td>
</tr>
<tr>
  <td class="tdLabel"><label for="register_country" class="label">Select Country:</label></td>
  <td><select name="country" id="register_country" style="width:160px">
  <option value="india">india</option>
  <option value="pakistan">pakistan</option>
  <option value="africa">africa</option>
  <option value="china">china</option>
  <option value="other">other</option>
</select>
</td>
</tr>
<tr>
  <td colspan="2"><div align="right"><input type="submit" id="register_0" value="register"/>
</div></td>
</tr>
</table>
</form>
</body>
</html>
OUTPUT: