Installing TensorFlow with GPU Support on Windows
CPU’s can fetch data at a quicker rate but cannot deal with more data at a time as CPU has to make numerous iterations to primary memory to perform a basic task. Then again, GPU comes with its own devoted VRAM memory hence makes fewer calls to main memory subsequently is fast.
You will require an NVIDIA graphics card that supports CUDA, as TensorFlow still just authoritatively supports CUDA (see here: https://www.tensorflow.org/install/gpu).
In the event that you are on Linux or macOS, you can probably install a pre-made Docker image with GPU- supported TensorFlow. Be that as it may, for those of us on Windows, we have to do things the most difficult way possible.
Table of Contents
- Prerequisites
- Install Microsoft Visual C++ Compiler
- Download and install the NVIDIA driver
- Install CUDA Toolkit
- Install cuDNN
- Installing and setting up the GPU environment
- Testing and verifying the installation of GPU
Prerequisites
Tensorflow GPU can work just on the off chance that you have a CUDA enabled graphics card. All the more current NVidia graphics cards within the previous three or four years have CUDA enabled.
On the whole, let’s check graphics card information. Open run window from the Start menu and run Control /name Microsoft.DeviceManager.graphics card will be presen tunder Display adapters.
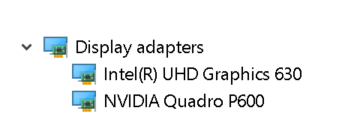
Each machine accompanies integrated graphic cards that are set on a similar chip as CPU and it depends on systems memory for dealing with graphics though discrete graphics card is an independent unit from the CPU and has high graphics processing execution.
GPU abilities are provided by discrete graphics cards. Consequently, check whether your machine has both incorporated graphics and the discrete graphics card installed.
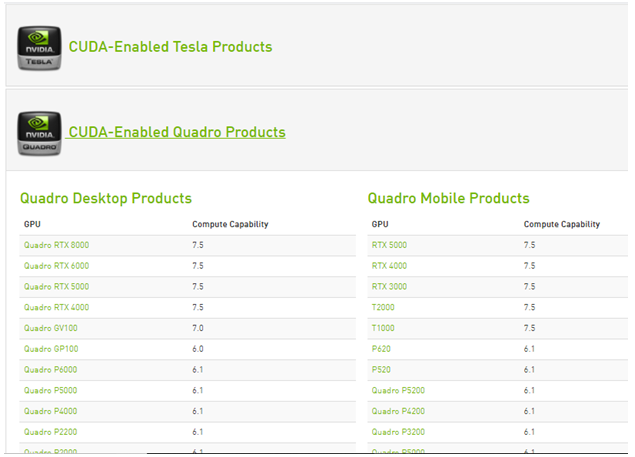
GPU Compute Capabilities of each Nvidia graphics card that was empowered with Cuda are enrolled on the Nvidia site. Just if the discrete graphics card is accessible in this list it can uphold TensorFlow GPU.
Whenever it’s realized that the discrete graphics card can support TensorFlow GPU. Start with installation.
Install Microsoft Visual C++ Compiler
The CUDA Toolkit utilizes the Microsoft Visual C++ (MSVC) compiler. The easiest way to install it is through Microsoft Visual Studio.
Download and install Visual Studio Community (which is free) from this site: https://visualstudio.microsoft.com/vs/community/. Truly, it’s a full IDE that we won’t utilize–we simply need the compiler that accompanies with it.
Download and install the NVIDIA driver
Nvidia driver is the product driver for Nvidia Graphics GPU installed on the PC. It is a program used to communicate from the Windows PC OS to the gadget. This product is needed as a rule for the hardware device to work appropriately
To download, navigate to the download page of Nvidia.com and give all the details of the graphics card and system in the dropdowns. Snap on search then we will give the download link.

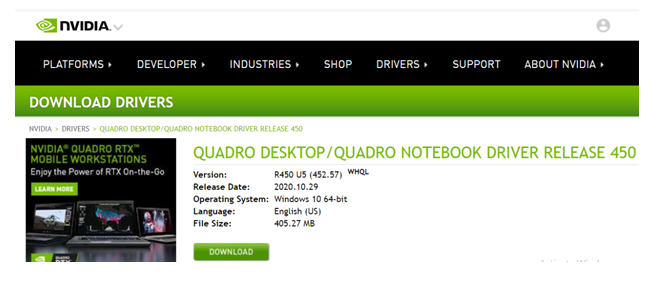
Install downloaded Nvidia drivers
Once installed we ought to get a folder NVidia GPU processing toolkit in program files of C drive containing CUDA subfolder inside.
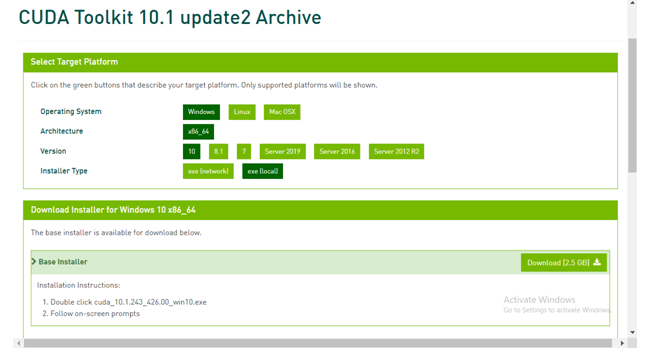
Install CUDA Toolkit
The Nvidia CUDA Toolkit gives an improvement environment for making high-performance GPU-accelerated applications. With the help of CUDA Toolkit, you can advance, create,and deploy your applications on GPU-quickened embedded systems, desktop area workstations, enterprise data centers, cloud-based stages, and HPC supercomputers. The toolbox incorporates GPU-accelerated libraries, optimization tools and debugging, a C/C++ compiler, and a runtime library to assemble and deploy your application on significant architectures including x86, Arm, and POWER.
There are different versions of cuda that are supported by Tensorflow. We can locate the current version of Cuda upheld by TensorFlow in TensorFlow GPU uphold webpage.
Under CUDA toolkit file of developer.nvidia.com download the necessary CUDA toolkit.

Install cuDNN
cuDNN is a library with set of enhanced low-level primitives to help the processing speed of deep neural networks (DNN) on CUDA compatible GPUs.
Direct to the cuDNN download webpage of the developer.nvidia.com. Here download the cuDNN version compatible with the CUDA version.

When the download is done, extract the downloaded folder. The downloaded folder must contain CUDA folder and this CUDA folder has to be matching in contents with the CUDA folder in the NVidia GPU processing toolkit folder of program files. Please refer the picture below.

Copy cudnn64_88.dll from bin of the most recent extracted folder and paste it in the comparative bin folder inside the Cuda folder of NVidia GPU computing tool kit.
Copy the cudnn.h file from include subfolder of most recent extracted folder and paste it in the comparable bin folder inside the Cuda folder of NVidia GPU computing tool kit.
Copy the cudnn.lib from lib>X64 folder subfolder of most recent extracted folder and paste it in the similar bin folder within the Cuda folder of NVidia GPU computing tool kit.
Now we have finished the download and installation of Cuda for GPU. Let’s set up the environment.
Installing and setting up the GPU environment
Anaconda is a python distribution that supports to set up a virtual environment. Assuming that anaconda is installed already, let’s begin with making a virtual environment.
Step 1:create an environment variable
Create a virtual environment from command prompt by using command – <cmd>conda create -n [env_name] python= [python_version]
Tensor flow supports only a rare versions of python.choose a python version that cares tensor while creating an environment.
Next activate the virtual environment by using command – <cmd> activate [env_name].
Inside the created virtual environment install latest version of tensor flow GPU by using command –<cmd> pip install — ignore-installed –upgrade TensorFlow-GPU
Whenever we are finished with the installation part of tensor flow GPU, check whether your machine has essential packages of python like pandas,numpy,jupyter, and Keras. if they don’t exist please install.
Install ipykernel through command –<cmd> pip install ipykernel
Let’s set the display name and link the kernel to the virtual environment variable using command –<cmd> python –m ipykernel install –user –name [env_name] –display-name “any name”.
Step2: set the python kernel in jupyter.
Open jupyter notebook and change the kernel to the environment variable we just set by clicking the kernel from the menu bar.
Testing and verifying the installation of GPU.
To check all the physical GPU devices accessible to TensorFlow. Run the beneath code
From tensorflow.python.client import device_lib
print(device_lib.list_local_devices())
This prints all the available devices for Tensorflow
To check if CUDA is enabled for the TensorFlow run below lines of code.
Import tensorflow as tf
print(tf.test.is_built_with_cuda())
Result will be a boolean value which brings in true if TensorFlow is worked with CUDA
To know whether GPU is set off during run time,start execution of any complicated neural network.
Task manager shows GPU utilisation and the memory being involved for the Tensorflow program execution.
Now the total installation and arrangement of GPU is finished.
- There are numerous free GPU processing cloud platforms that could make our GPU calculations in deep neural networks quicker. So, check them out if your machine does not contain a committed GPU.
- All the above installation steps are reliant on each another, so we have to follow same sequence as referenced above.